Monday, February 8, 2010

Carmel Topped Flan

I apologize in advance for the crappy photos, I took them with my camera phone since I forgot to bring my camera. This was delicious, naturally gluten-free, and very easy to make. Go try it yourself!


Caramel Topped Flan from Dorie Greenspan's "Baking: From My Home to Yours"
Caramel
1/3 cup sugar
3 tablespoons water
squirt fresh lemon juice

Flan
1.5 cups heavy cream
1.25 cups whole milk
3 large eggs
2 large egg yolks
1/2 cup sugar
1 tablespoon vanilla

Prep steps:
Preheat oven 350, put 8in NOT non-stick cake pan in oven to warm up
Line roasting pan with paper towels
Fill a teakettle with water and boil. Once water has boiled, turn it off.

To make the caramel topping:
Stir sugar, water, lemon juice over med high heat until sugar becomes amber colored caramel, about 5mins. Remove from heat at first whiff of smoke. Pour into cake pan and set aside.

To make the flan:
Bring cream and milk to just a boil. Meanwhile, in a large bowl mix eggs, yolk, sugar together vigorously for a min, then add vanilla. Slowly stir in 1/4 of the hot milk mixture to temper. Slowly add in the rest. Skim off foam and bubbles. Pour over the caramel.

To cook:
Put the cake pan in roasting pan. Pour water from the teakettle into roasting pan being careful not to splash any into the cake pan. Slide into oven and bake for 35 mins, till a little puffy and golden. Fridge for 4 hours. When ready to serve, invert on a rimmed plate.


Thursday, December 31, 2009

Lime Sugar Cookies

I've been eyeing this recipe since I hosted a babyshower back in April and had about 18 limes left over. But, I only just got around to trying it! I thought it would be fun to bring to a NYE party tonight... simple with a little zing.

These cookies rock. Seriously, they rock! Just the right amount of citrus zing to it.

I have no idea why, but I used lemon zest in the sugar coating and lime juice in the cookie instead of vice versa. Pretty sure it didn't make a big difference :)


Recipe found at EatMeDelicious
Yield: 24 giant cookies (I didn't get 24 cookies, maybe because I ate a little too much of the dough)

1/2 cup sugar
1 tsp lime zest (from 2 limes)

Remaining lime zest from the 2 limes
1 1/2 cup sugar
1 cup butter, room temperature
2 large eggs, room temperature
1 tsp vanilla
1 tbsp lemon juice
2 3/4 cup flour or your favorite GF flour substitute, I used better batter as always
1/4 tsp salt
2 tsp cream of tartar
1 tsp baking soda

Prepare lemon sugar: In a mini food processor, blend 1/2 cup sugar with 1 tsp lemon zest. Pulse several times until the lemon zest is incorporated into the sugar. Put sugar mixture in a shallow bowl and stir lightly with a fork to break up any clumps. Set aside.

Prepare cookie dough: In a medium bowl, stir together flour, salt, cream of tartar and baking soda. Set aside.

In a large mixing bowl, cream together butter and remaining 1 1/2 cup sugar. Blend in eggs, one at a time then add vanilla, lemon juice, and remaining lemon zest. Add flour mixture, one cup at a time, blending well after each addition, until all flour is incorporated.

Refrigerate dough for one hour.

Preheat oven to 350 degrees.

Shape the cookies: Using a jumbo cookie scoop or your hands, shape two tablespoonfuls of dough into a ball and roll in lemon sugar. Place ball of dough on cookie sheet and press down lightly with the bottom of a glass until cookie is about 1/2 inch thick. Repeat. Six cookies will fit on one 18" x 13" baking sheet.

Bake cookies for 10-12 minutes at 350 degrees.

Wednesday, December 16, 2009

Better late than never

I have been delinquent in my posting. Actually, I haven't been cooking much of interest. But I wanted to post some pics to show what Thanksgiving looked like for my family. Aunt Laura and Uncle Tom put on a great meal, as always!

The spread:


My contribution, candied sweet potatoes


My sister's gluten-free stuffing:

A nice big plate for me, because my family rocks and kept just about everything gluten-free! My favorite is the creamed corn from aunt Laura. Yummm... I always look forward to that one!


Thursday, November 19, 2009

Who taught you grammar?

More like "who taught you how to read", but I'm going with a title theme here. I'll make cookies for you if you can tell me where these titles are coming from...

So, I'm leaving town tomorrow night after work, driving down to Philly to run a marathon on Sunday. I want to bring some cookies because, well, I think I deserve some homemade cookies after running a marathon. So I flipped through my recipe book, looking for the chewy chocolate chip recipe I've been using for years, the same my sister reviewed here recently.

I found the recipe (so I thought) and got to work. Things seemed a little strange right off the bat, like how it only called for 1 egg white. But I didn't think much about it since I haven't made these cookies in over a year, and Cooks Illustrated does weird things with their recipes. Like adding vodka to pie crust. Then I got to the park where it told me to add the corn syrup. Corn syrup? In chocolate chip cookies? That seemed even more bizarre. But did I stop to check what I was doing? Heck no sister, I just pressed right on. Until I came to the part where it told me to add the cocoa powder. Ok, stop, I know that just ain't right. Finally I read the recipe a little closer and see that I was indeed NOT making "chewy chocolate chip cookies" but "chewy chocolate cookies".

Now, I'm not going to lie and act like this is a big deal. I mean, a cookie is a cookie (well, as long as it's homemade), and I might not have made these cookies in a long time but I do know they are darn tasty. I'm just getting amused and admittedly a little worried by some airhead moves I've been making recently. Like how last weekend, when cutting Dan's hair, I forgot to put the guard on the trimmer and wound up having to shave his head basically totally bald. 27 is too young for alzheimer's, right?

Oh well, at least I've got some good cookies to look forward to. If, you know, I remember to pack them. Speaking of which, I better go put my sneakers in the car right now.


Chewy Chocolate Cookies, from Cooks Illustrated adapted to be GF
*This recipe doesn't make very many

Ingredients
1/3cup granulated sugar (about 2 1/2 ounces), plus 1/2 cup for coating
1 1/2cups GF flour mix (I use better batter)
3/4cup Dutch-processed cocoa powder
1/2teaspoon baking soda
1/4teaspoon table salt plus 1/8 teaspoon table salt
1/2cup dark corn syrup (see note)
1large egg white
1teaspoon vanilla extract
12tablespoons (1 1/2 sticks) unsalted butter , softened (70 degrees)
1/3cup packed dark brown sugar (about 2 1/2 ounces, see note)
4ounces bittersweet chocolate , chopped into 1/2-inch pieces (see note)

Instructions
1. Adjust oven racks to upper- and lower-middle positions and heat oven to 375 degrees. Line 2 large (18- by 12-inch) baking sheets with parchment paper. Place ½ cup granulated sugar in shallow baking dish or pie plate. Whisk flour, cocoa powder, baking soda, and salt together in medium bowl. Whisk corn syrup, egg white, and vanilla together in small bowl.

2. In stand mixer fitted with paddle attachment, beat butter, brown sugar, and remaining 1/3 cup granulated sugar at medium-high speed until light and fluffy, about 2 minutes. Reduce speed to medium-low, add corn syrup mixture, and beat until fully incorporated, about 20 seconds, scraping bowl once with rubber spatula. With mixer running at low speed, add flour mixture and chopped chocolate; mix until just incorporated, about 30 seconds, scraping bowl once. Give dough final stir with rubber spatula to ensure that no pockets of flour remain at bottom. Chill dough 30 minutes to firm slightly (do not chill longer than 30 minutes).

3. Divide dough into 16 equal portions; roll between hands into balls about 11/2 inches in diameter. Working in batches, drop 8 dough balls into baking dish with sugar and toss to coat. Set dough balls on prepared baking sheet, spacing about 2 inches apart; repeat with second batch of 8. Bake, reversing position of the baking sheets halfway through baking (from top to bottom and front to back), until cookies are puffed and cracked and edges have begun to set but centers are still soft (cookies will look raw between cracks and seem underdone), 10 to 11 minutes. Do not overbake.

4. Cool cookies on baking sheet 5 minutes, then use wide metal spatula to transfer cookies to wire rack; cool cookies to room temperature.

You- stop multiplying!


So, Dan's family was coming to visit for lunch. Chili is an easy to make ahead dish. I wanted to use a mixture of ground pork and goat (yes, you read that right- goat. Chestnut Farms just added it to the monthly meat share). I found a tasty looking goat recipe that said it serves 4-6 people. I needed to feed 8 people. Granted, 2 of them were children, but still- I did what I think anyone would do. I doubled the recipe. Whoever wrote that recipe was way off though, because I am pretty sure I could have fed a football team with the amount of chili we ended up with.

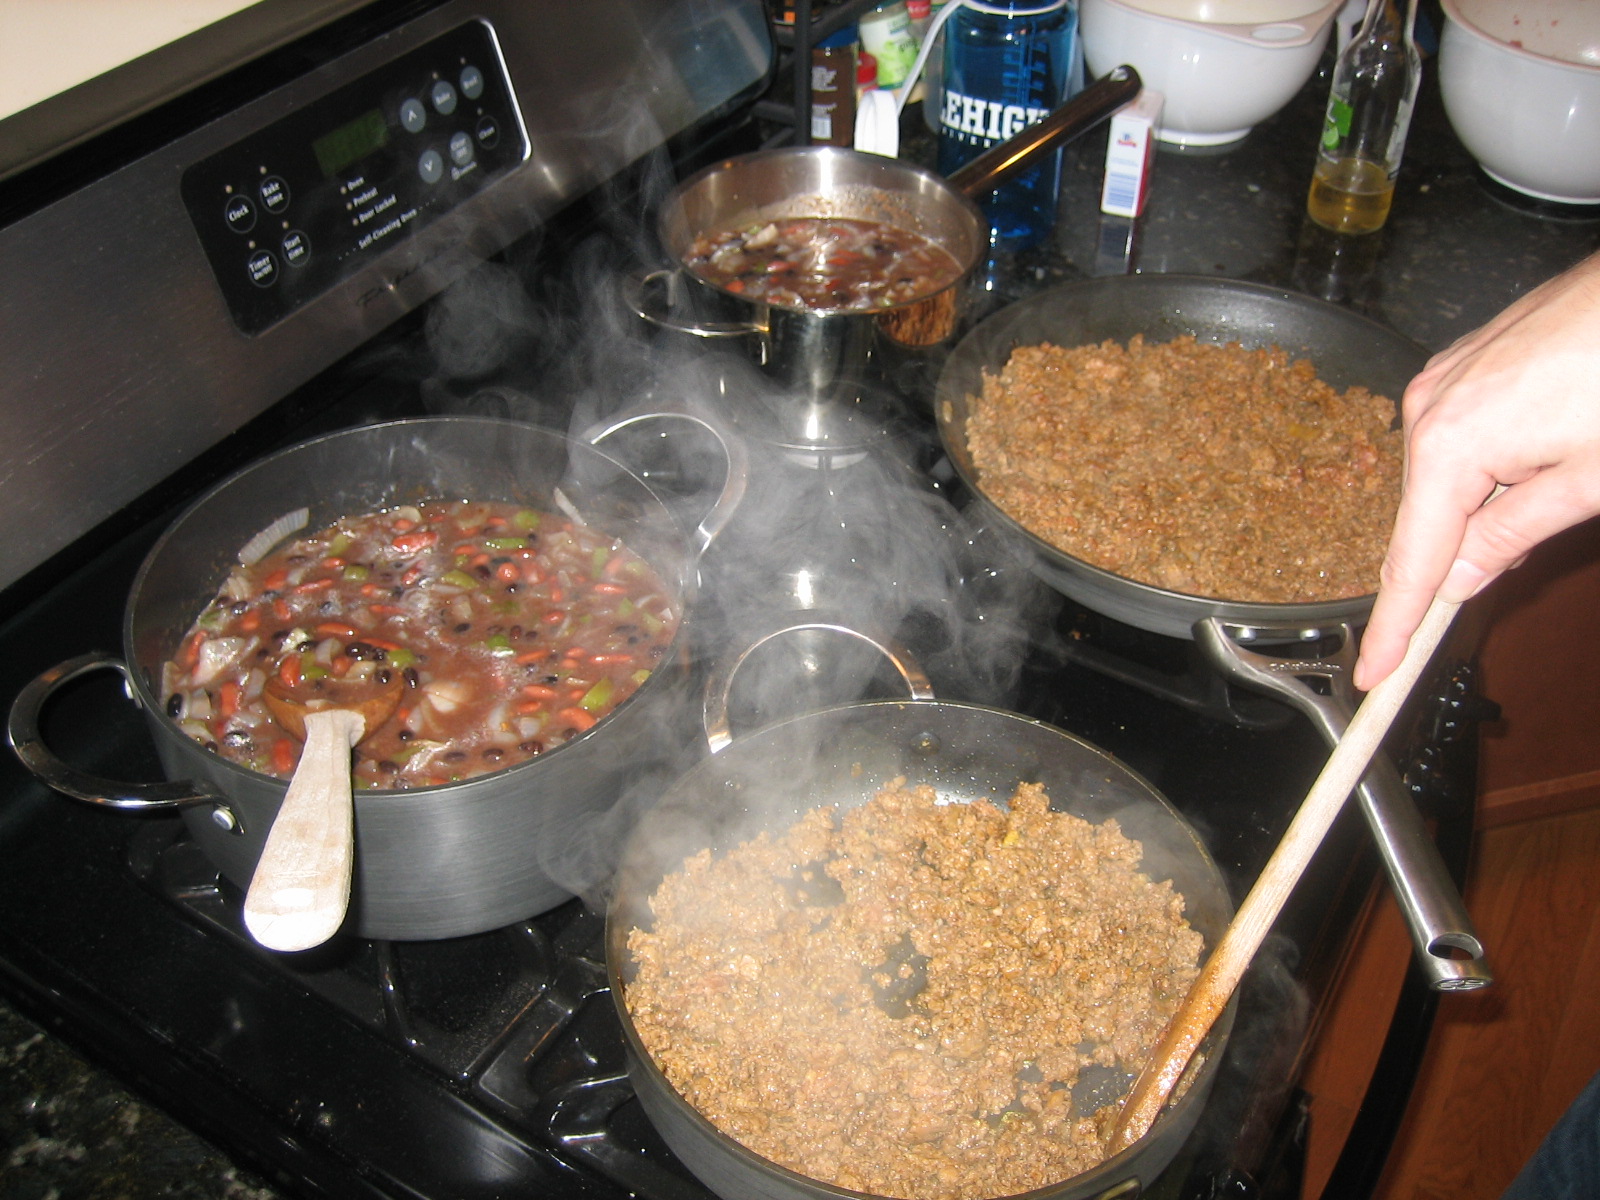
Good thing Dan was around to help, because things got messy. I didn't realize just how much chili we were talking until we started cooking. Um, how are we going to fit meat, beans, tomatoes, etc into this pan when we can barely stir the onions?

Long story short, we ended up splitting it into two batches. But, the pans weren't the same size so we ended up with roughly 1/3 in one pan and 2/3 in the other. So between multiplying the ingredients by 2 and then dividing into thirds... well, it got confusing. Especially since each batch required a pan and a pot at different (but overlapping) times.


We used this recipe for "Sante Fe Goat Chili" from here, but doubled it and used a combo of goat and pork.

1 lb of grassfed ground goat (goat-burger), thawed
1 medium sweet onion, chopped or 2 tablespoons of dried onion flakes
1 large green bell pepper, chopped
1 can of stewed tomatoes, undrained
1 8-oz can of tomato sauce
Approximately 1 cup of water (skipped this, no room left in pot, didn't miss it)
1 16-oz can of blackbeans
1 16-oz can of red kidney beans
1 cup of frozen whole kernel corn (skipped this)
2 cloves of garlic, minced
1 tablespoon of chili powder, depending on taste
1 tablespoon of ground cumin
1 teaspoon of chopped fresh or dry cilantro (skipped this because Dan did the grocery shopping and came home with parsley)
1/2 teaspoon of sea salt
1/2 teaspoon of ground black pepper
1/8 teaspoon of ground red cayenne pepper
1 tablespoon of olive oil


1. In a medium skillet, heat 1 tablespoon of olive oil over medium to high heat. Add the onion, bell pepper, lower the heat, and sauté for about 10 minutes until nicely browned and caramelized. Be careful to not allow onions to stick to skillet. Dump sautéed` peppers and onions into a large stew pot.

2. In stew pot with vegetables add stewed tomatoes, tomato sauce, water, kidney beans, and blackbeans. Start to simmer on low heat.

3. Grassfed goat-burger is very lean so some additional oil in the skillet may be needed to prevent sticking. Place the goat-burger in the skillet used to sauté vegetables. Start to brown while mixing in the garlic, chili powder, cumin, cilantro, salt, pepper, and cayenne pepper.

4. Once well browned, add meat mixture to stew pot mixture. If mixture seems to be a little too thick (Consistency should be that of a thick soup.) additional tomato sauce may need to be added to prevent sticking. Bring soup to a simmer and simmer for 1 hour, stirring occasionally. If a hotter taste is desired, adjust with pepper, chili powder, and/or Tabasco Sauce while simmering.

We made this the night before, left it in the fridge overnight, then dumped into the crockpot to warm up for a few hours. Served it with GF cornbread.

Thursday, November 5, 2009

The quest for Cheesecake: part 2

Ok, now I have my GF graham crackers. The cheesecake quest can continue! Being fall and all, I settled on a Spiced Pumpkin Cheesecake recipe from my favorite go-to recipe source, Cooks Illustrated.

Um, wow, good choice.

I had a little difficulty with the crust. The recipe called for 9 graham crackers/5oz. Well, I made my own crackers where only 4 ended up in (rough) graham cracker shape, and I don't have a scale to do ounces. My counter turned into an edible puzzle as I grouped cookie scraps into approximate graham cracker shapes. I think I ended up with too much though... I forgot to account for the fact that my crackers were much thicker. I compensated by just adding an extra tablespoon or two of butter into the crust. I think it worked out okay.

Drying the pumpkin


Cheesecake batter yuummmmm

First baked the crust for 15 mins

Then poured the cheesecake batter in, placed in a water bath, and cooked. Unfortunately, my tinfoil was not watertight. I thought "no way will any water get in"! I used 2 layers of special extra wide, heavy duty foil. I thought there were no weak points. But alas, there must have been. When I removed the foil at the end there was a good amount of water in there. #$*$.


Well, the little bit that we tried didn't have a soggy crust. Actually, it was perfectly crispy. But, I wouldn't be surprised if there are soggy bits somewhere!


Anyway, this was one delicious cheesecake. Much better than my last cheesecake attempt :)


Spiced Pumpkin Cheesecake

Ingredients

Crust
5 ounces graham crackers (9 whole crackers), broken into large pieces
3 tablespoons granulated sugar
1/2 teaspoon ground ginger
1/2 teaspoon ground cinnamon
1/4 teaspoon ground cloves
6 tablespoons unsalted butter , melted

Filling
1 1/3 cups granulated sugar (10 1/3 ounces)
1 teaspoon ground cinnamon
1/2 teaspoon ground ginger
1/4 teaspoon ground nutmeg
1/4 teaspoon ground cloves
1/4 teaspoon allspice
1/2 teaspoon table salt
1 can (15 ounces) pumpkin
1 1/2 pounds cream cheese , cut into 1-inch chunks and left to soften at room temperature, about 30 minutes
1 tablespoon vanilla extract
1 tablespoon lemon juice from 1 lemon
5 large eggs , left at room temperature, about 30 minutes
1 cup heavy cream

Instructions

1. FOR THE CRUST: Adjust oven rack to lower-middle position and heat oven to 325 degrees. Spray bottom and sides of 9-inch springform pan evenly with nonstick cooking spray. Pulse crackers, sugar, and spices in food processor until evenly and finely ground, about fifteen 2-second pulses. Transfer crumbs to medium bowl, drizzle melted butter over, and mix with rubber spatula until evenly moistened. Turn crumbs into prepared springform pan and, using hand, spread crumbs into even layer. Using flat-bottomed ramekin or drinking glass, press crumbs evenly into pan bottom, then use a soup spoon to press and smooth crumbs into edges of pan. Bake until fragrant and browned about the edges, about 15 minutes. Cool on wire rack while making filling.

2. FOR THE FILLING: Bring about 4 quarts water to simmer in stockpot. Whisk sugar, spices, and salt in small bowl; set aside. To dry pumpkin (see illustrations below): Line baking sheet with triple layer of paper towels. Spread pumpkin on paper towels in roughly even layer. Cover pumpkin with second triple layer of paper towels and press firmly until paper towels are saturated. Peel back top layer of towels and discard. Grasp bottom towels and fold pumpkin in half; peel back towels. Repeat and flip pumpkin onto baking sheet; discard towel.

3. In standing mixer fitted with flat beater, beat cream cheese at medium speed to break up and soften slightly, about 1 minute. Scrape beater and bottom and sides of bowl well with rubber spatula. Add about one third of sugar mixture and beat at medium-low speed until combined, about 1 minute; scrape bowl and add remaining sugar in two additions, scraping bowl after each addition. Add pumpkin, vanilla, and lemon juice and beat at medium speed until combined, about 45 seconds; scrape bowl. Add 3 eggs and beat at medium-low until incorporated, about 1 minute; scrape bowl. Add remaining 2 eggs and beat at medium-low until incorporated, about 45 seconds; scrape bowl. Add heavy cream and beat at low speed until combined, about 45 seconds. Using rubber spatula, scrape bottom and sides of bowl and give final stir by hand.

4. Set springform pan with cooled crust on 18-inch-square doubled layer heavy-duty foil and wrap bottom and sides with foil; set wrapped springform pan in roasting pan. Pour filling into springform pan and smooth surface; set roasting pan in oven and pour enough boiling water to come about halfway up side of springform pan. Bake until center of cake is slightly wobbly when pan is shaken, and center of cake registers 145 to 150 degrees on instant-read thermometer, about 1 1/2 hours (see note). Set roasting pan on wire rack and use paring knife to loosen cake from sides of pan. Cool until water is just warm, about 45 minutes. Remove springform pan from water bath, discard foil, and set on wire rack; continue to cool until barely warm, about 3 hours. Wrap with plastic wrap and refrigerate until chilled, at least 4 hours or up to 3 days.

5. TO SERVE: Slide thin metal spatula between crust and pan bottom to loosen, then slide cake onto serving platter. Let cheesecake stand at room temperature about 30 minutes, then cut into wedges and serve.

The quest for Cheesecake, part 1

I've been craving cheesecake. I did a bunch of searches for GF cheesecake crust (you gotta have the crust), but I wasn't happy with any of them. The graham cracker crust is key! So, I switched directions and went looking for a GF graham cracker recipe.

I found a pretty simple looking one from here

I modified it a little bit, because the GF mix I use (Better Batter) already contains xanthan gum and I didn't want to add more.

The batter


Not surprisingly, this dough was fragile and it was difficult to keep the pieces in tact. Only 4 survived... the rest I just cooked as scraps. Not like it matters, they were going directly into the food processor later.

I think they tasted like graham crackers, but I couldn't decide for sure. It's been a while. But any which way, they tasted great and would do just fine for a cheesecake crust

GF Graham Crackers

Modified from livingwithout

2 ¼ cups gluten-free flour mix
½ cup packed brown sugar
1 ¾ teaspoons cinnamon
1 teaspoon gluten-free baking powder
½ teaspoon baking soda
½ teaspoon salt
7 tablespoons butter or margarine, cut into pieces
3 tablespoons cold water
3 tablespoons honey
1 teaspoon vanilla

1. Mix together gluten-free flour mix, brown sugar, cinnamon, baking powder, baking soda and salt.
2. Using your fingertips, work butter into dry ingredients. I just softened the butter and added it into the mixer. No butterfingers for me.
3. Stir in 3 tablespoons cold water, honey and vanilla. If dough is too dry, add a little more cold water, a teaspoon at a time. I added 2 extra tablespoons! I kept adding water until the dough formed a ball in the mixer. It started out way too crumbly.
4. Gather dough into a soft ball. Cover in plastic wrap and refrigerate for an hour.
5. Preheat oven to 325 degrees. Lightly grease a cookie sheet and line with parchment paper.
6. Cut two zip lock bags (gallon size) down each parallel side so that each opens out into one long sheet. Roll a piece of dough between the two sheets to about 1/8-inch thickness, depending on how thick you like your graham crackers. Cut into 2 x 3-inch pieces and prick lightly all over with a fork. Remove top zip lock sheet. Take remaining sheet with dough on it and turn it over. Lay it flat, rolled dough side down, onto prepared pan.
7. Bake for 12 to 15 minutes or until golden brown. If cookies spread and bake together, re-cut while still warm and loosen them. Let cookies cool slightly before transferring to cooling rack.